Monday, December 23, 2013

Christmas Pajamas!

My little man's Christmas pajamas are finished and I have to say - what a fun sew! This may turn into a tradition; we'll see! (At least for now he loves them....as he grows he may not always appreciate handmade. For now, I'll enjoy it!)

He received them early, just in time for his class Polar Express party. And really, he picked out the snowmen fabric and wouldn't let me forget I had a project in the works, so these were no surprise! 

However, I read somewhere of a family who opens their Christmas pajamas on Thanksgiving night. Great idea, right? Then they can wear them the whole Christmas season!

I went with the Peek-A-Boo pattern, Sweet Dreams Button Up Pj Set. I liked the range of sizes included in the pattern (3 months - 12 years) plus I have used these patterns before and had good luck with them. That's saying a lot because I am a novice when it comes to sewing clothes! To me, putting together a quilt is much more simple. :)


These came together without any problems - pleasantly surprising! I wouldn't label this project as quick, however. The piping really slowed me down, but I love the detail. I bet a set of pjs without the piping would be a much faster project. 


As I mentioned before, my son was in love with these little snowmen. It's a quilting weight cotton from Joann's, which faded a bit. Bummer. It turned out fine, but a flannel would be much more cozy. Maybe next time!


The fit was perfect, and I didn't even go to the effort of measuring my little man or another pair of pajamas. I just went with the size I would have purchased. 


He loves them and it was fun for me!

Merry Christmas!


Thursday, December 12, 2013

Quick Charity Quilts

A couple of years ago I picked up a few prints from the flat fold table at my local quilt shop for a really low price, knowing they would make great charity quilts.


Earlier this year I put together the pink quilt so I could practice quilting in loops...


And then when my husband bought a {new to me} sewing machine for my birthday in September, I put together this boy's quilt so I could get a feel for the Bernina walking foot. And that guide bar? Awesome! Makes grid quilting a breeze!


When I heard our church group was participating in a community charity event this weekend, I knew these quilts would be perfect! So I quickly finished the binding and they are ready to go.
They each measure 44" x 60" and though they are not fancy, these simple whole cloth quilts are warm!

Wednesday, December 4, 2013

Hourglass Quilt & Patchwork Pillow for Baby

We had an awesome Thanksgiving - good food and good family time - and even x2! We enjoyed two Thanksgiving dinners, one with each side of the family.

My sister came to town for the holiday, so I was able to give her the gifts for her baby boy, due to arrive in a few weeks! We're excited! And now I can share the finished set here...


This simple quilt is made of basic hourglass blocks. I used the leftover scraps to make a patchwork pillow. (Which I think I like even more than the quilt!)

Want to make one? Very simple. You will need...

6 fat quarters or 1/4 yards - assorted prints
1 1/5 yards background fabric - solid
1/2 yard binding
1 1/5 yards backing

Cut the prints into squares measuring 7.5". 
From the background fabric cut 6 strips, each 2.5" x width of fabric. These will become the border.
Also from the background fabric, cut 5 strips, each 7.5" wide x width of fabric. Then subcut into 7.5" squares.

You will use 24 print squares and 24 background squares to make the hourglass blocks.

Never made an hourglass block? 
There are many great instructions out there already on how to assemble an hourglass block. Check this out: Hourglass Block Tutorial.
Though my blocks are bigger, the construction is the same. I trimmed my blocks down to 6.5" square.

I arranged and sewed my blocks together into a 6 x 8 grid. 
After the rows are sewn together, piece two border strips together along the short ends to make a very long strip. Sew this long strip along the left side (a long side) of the quilt top, centering the seam with the center of the quilt top. Repeat this process for the right side. Trim the excess. Then sew one strip along the top and one along the bottom to complete the outer border. The quilt top is finished. :) It should measure approximately 40" x 52".

Quilt and bind! Here are some links with more detail: Quilting Basics.

For the front of the patchwork pillow, I cut the print scraps into 3 3/4" squares and sewed these squares into a 4 x 4 grid. Then I made this patchwork panel into a mini quilt. I used a batting scrap, backed it with muslin, and then quilted in straight lines, just on either side of every seem. 
When this mini quilt was complete, I cut a piece of fabric for the back of the pillow - the same size as the front. I lined this back piece with interfacing to give it a little more structure. (You could also quilt the back panel in the same manner as the front.)
Then I sewed the front (the mini quilt) to the back around the edges (right sides together), leaving an opening for turning. After clipping the corners and turning right side out, I stuffed it with fiberfill until it was firm and then hand stitched the opening closed. The pillow measures approximately 13" square.

I used a Michael Miller print - On the Go in Navy (the cute little bicycles!) as well as several Riley Blake dots and stripes.

Excited for more boys in this family!

Wednesday, November 20, 2013

Christmas Pajamas

It feels like the holidays are in full swing! Wherever we go, there is Christmas music playing and gifts and decorations for sale everywhere. Are we the last family in this world holding onto the day-after-Thanksgiving decorating tradition? Our tree may not be up yet, but there are plenty of preparations underway!

Christmas Pajamas - a classic tradition!
We've always given our son one gift on Christmas eve - special pajamas, of course. And up until now, I've just shopped around to find the perfect pair.
But this year, while shopping for some binding fabric for the Spinning Spectrum quilt, my son picked out a snowman print and asked if we could turn it into pajamas. How could I turn down such a cute request? He won't be little for long, and may not always appreciate handmade things.


Well, I'd already had my eye on a couple patterns, but I did a bit more browsing (I love seeing what others make!) Here are a few of my favorites.

If you are looking for a FREE pajama pattern or tutorial, one of these may help you out:

Pajama-Rama Top & Bottoms - Shwin & Shwin

Taylor's Pajama Pants PDF Pattern - Create Kids Couture 
Flannel Christmas Nightgown - Riley Blake


Simple Pajama Pants Tutorial - Simply Modern Mom

How cute are these pajamas with the bottom flap?
Faux Union Suit Tutorial - Dahlhart Lane

Or if you don't mind paying a few dollars, here are a few others:
Alex & Anna Winter PJs - Peek-a-Boo Patterns
(I have this pattern and it is great! Great directions and photos make this one easy - even if you're intimidated to sew with knits)

Monday, November 18, 2013

Busy Bicycles

Do you remember this stack?


Well, once I delivered my Spinning Spectrum quilt to the Festival of Trees last week, it was time to pick up work on a few other little projects. First up, these bicycles! I love this print (Sarah Jane for Michael Miller - On the Go in navy) and picked a few Riley Blake dots and stripes to go with it. 

Before long I had all the hourglass blocks complete and sewn together...


and it is so busy! I should have known; these prints are very bold and a strong contrast to the white-on-white background. A little much? We'll see...


Pin basted and ready to be quilted!

Saturday, November 9, 2013

A Colorful Finish

Alright, way overdue for an update, I'd say!
I'm working on another project - my biggest yet - and I'll just say, I'm a bit more tired than usual. :) Excited as can be, but just not my productive self. This project will be complete in the spring! It's been a looooong time coming, so we are very, very grateful.

So even though I have been sewing, I've haven't kept the pace up on the blog. But I'm feeling good and have a few projects I'm excited about, so we'll keep plugging along, if you care to follow.

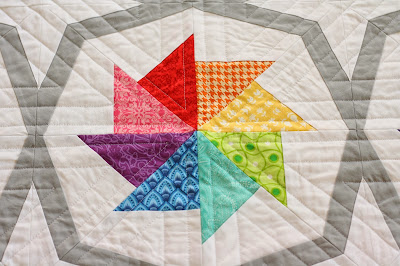
So it's time to share my favorite quilt ever! My Spinning Spectrum quilt is finished!


This quilt was more time intensive than my usual simple baby quilts. I stretched myself on the design and piecing - a paper pieced pattern that I drafted myself, and my first paper pieced project. 


When the quilt top was complete, I was really pleased. It came together just as planned. And I just wasn't sure if I could quilt it myself. I almost sent it off to a long arm quilter!
My husband encouraged me to see this project through to the end - on my own. I really struggled coming up with a design that was relevant to the quilt top and manageable on my machine. The quilt sat for almost two weeks while I doodled and tried to make a decision. Then one night an idea popped into my head and I knew I had it!


I quilted in straight lines, originating in the center color wheel, a vertex within in each triangle, and then angling out to the edges of the quilt. The quilting lines are spaced 1" and give the finished quilt a great texture.


These stars are a fun secondary design.


The finished quilt measures 48" x 48", intended to be a wall hanging.


Though this would be fun to hang in my craft room, it's destined for Festival of Trees. Today was the first day to enter quilts, and just like last year, I took a peek behind the scenes after I dropped off my quilt. Imagine a huge room with tons of people working to receive, sort, and price lots of beautiful gifts, most handmade. It's a real life Santa's workshop! You can just feel like excitement; and I'm grateful to be one small part of it!

Read more about Festival of Trees (and a bit more info here and here), or see the quilts I donated last year

Tuesday, September 24, 2013

Slowly Spinning

Yes, I am still here....plugging away at these paper pieced blocks.


After making the first block, something was bugging me (and it was not just the fact that I had made every mistake possible before finally getting it right). It had turned out just like I had planned, but to me, it appeared to spinning backward. Weird? I don't know, but I knew I had to make a change.

So before I moved on, I flipped my pattern so it was be the reverse, and the the blocks would spin clockwise. That's better. :)


I'm happy to say the second block did not require the use of a seam ripper {happy day!} and turned in the right direction (at least, in my opinion). But it was still slow. I've since gained a rhythm and can work on several pieces at once, kind of like chain piecing, and it's much more efficient. But still, one block takes about an hour and a half to make from start to finish. Now I know, you have to love the process to take on a paper pieced project!


I'm just relieved this will be a wall hanging and not a bed quilt. :)

Hopefully soon I'll have a complete quilt top to share!

Monday, September 9, 2013

Spectrum Quilts

Last spring (yes, over a year ago!) I was lucky enough to participate in Bianca's (Sweet Diesel Designs) rainbow charm swap. Perfect opportunity for someone like me - relatively new to the sewing scene - to get a wide range of fabrics quickly and inexpensively. Well, it has taken a long to decide on a project! So many possibilities for one set of charms.

Here are a few of my favorites....
Spectrum Half Square Triangle Quilt
Circle of Geese - Colorwheel block - link to paper pieced pattern
Starflower Block Quilt - with tutorial - Ellison Lane

Jeni's Color Wheel Mini Quilt - based on Purl Bee's free pattern

And a few more that you'll have to go see:
Modern Drunkard's Path
Color Wheel Wall Hanging

See? How could I decide on just one project? So many cool options.
I knew I just had to dive in.

I landed here, combining several features of my favorites:


This block should eventually become something like this...


I was inspired by the "Wheel of Fortune"block in 5,500 Quilt Blocks Designs. (I love this book!) If you google this, you will find about a million variations and a few free patterns. But I wanted something very specific, requiring a few adjustments - like touching outer rings, just the right proportions, and it had to be sized for good use of charm squares, so I set out to make my own pattern.


I knew this block's detail would require paper piecing. 
Paper piecing? Yeah, I had heard of it and wanted to give it a try. But designing your own pattern for a first try? (And in Photoshop?) Probably not a great idea. A bit ambitious. It was a lot of trial and even more error. But eventually, I was able to produce what was in my mind.

charms sorted - and encroaching on someone's space :)
Now with all that time invested and charms sorted and ready to go, I am committed!
I just hope I can pick up speed! :)

 -  Click here to see the "Over the Rainbow Charm Swap" flickr group - some really neat projects there. (And it didn't take these ladies a year to cut into their charms! Amazing.)

Thursday, September 5, 2013

Isosceles Baby Quilt

I have seen many simple triangle quilts floating around the online crafting community the last little while, and I thought it seemed like a great way to use up a few pieces in my stash that have been sitting for a long time.


I picked up this retro-ish floral swirl a few years ago for $1 a fat quarter. (I think it is part of the Park Slope line by Erin McMorris). And I've wondered what to do with it since. Sometimes I snag a deal and then feel stumped...

As the busy summer went on and I really didn't get much time to craft, I decided just to jump in with something easy, and not think about it too much. I needed a project!


I picked up this isosceles triangle template at Joann's on sale (Tri Tool), just after I had drafted a paper template to use. Perfect! This was easier to use and inexpensive - and could be used for different size triangles. And because this quilt was quick and easy, I think this will be a good tool to have. (If you'd like to use my paper template, there is a link below.)


I cut my fabrics into strips 6 1/2" wide, - the same height as my unfinished triangles. I then used the template, aligning the bottom and top edges, to quickly cut the sides of each triangle. I started cutting at the folded edge of each strip (cutting a half triangle) and then when I reached the selvage ends, I went ahead and cut a partial triangle with whatever was left. I used these pieces on the ends of each row. 
Each quarter yard yields about 11 full triangles and 2 partial triangles.


I pieced the triangles together, offsetting the pieces so that the 1/4" seam intersects the edges, and when the pieces are pressed open, the top and bottom of the row will be flush. (After doing this once or twice, it becomes easy to eyeball).


I pieced 13 triangles together (plus partial triangles at each end) to make a row, and then I sewed together 9 rows. After I had all the rows sewn together, I trimmed the right and left edges straight.


I practiced quilting in 'Loops and Double Loops' on this one. I'm happy to say I'm improving! This time my loops are a bit more even in size and spacing than the last.

This quilt measures 42" x  54".

If you'd like to make your own, you will need:
6 - 1/4 yard prints 
1 1/4 yard solid 
1/2 yard binding (or make a scrappy binding using your prints. You will just enough left over to cut one strip 2 1/2" by the width of fabric from each print - perfect for binding.)
1 2/3 yard backing (this quilt top will be a full 42" wide, so make sure your backing fabric is at least this wide as well)


Anyway, there's the first finish of the school year! It's only been a few days, but I think we're finding a routine. That should mean I get more work done, and have more time for sewing!